
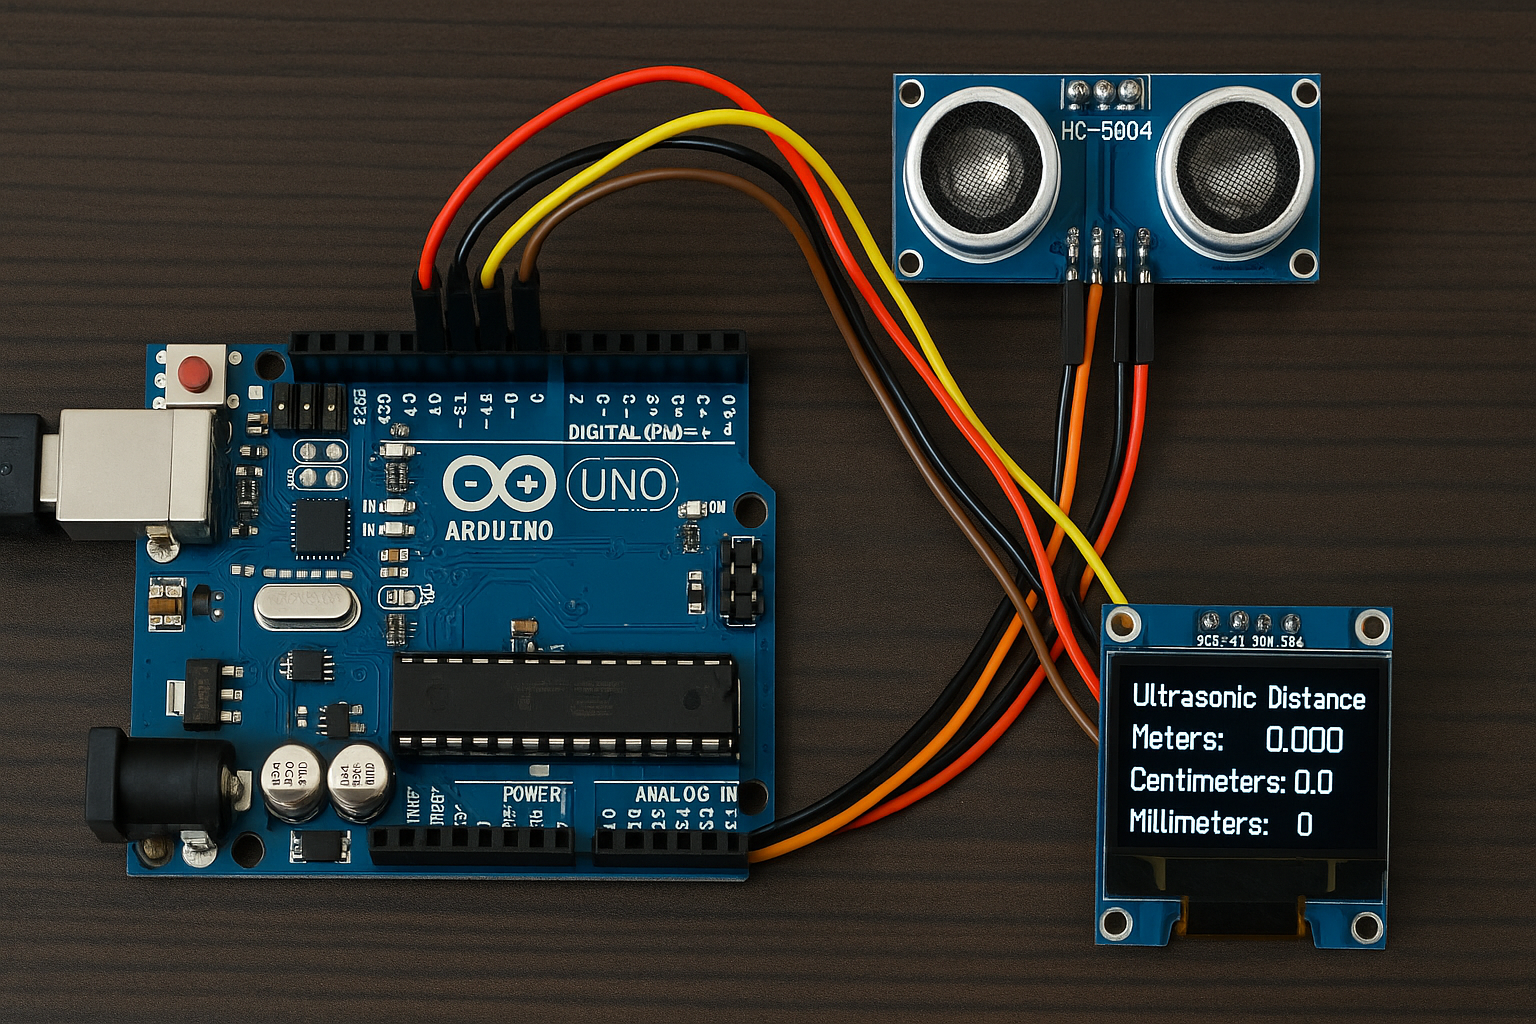
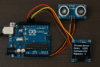
Learn how to build an Arduino-based distance measurement device using the HC-SR04 ultrasonic sensor and a 128×64 I2C OLED (SSD1306). Displays accurate distances in millimeters, centimeters, and meters. Perfect for DIY robotics, water level monitoring, parking sensors, and more.
🧰 Usage Examples of the Ultrasonic Distance Meter Project
1. Obstacle Detection for Robots
- Mounted on the front of a mobile robot or drone.
- Measures distance to obstacles for collision avoidance.
- Ideal for DIY line followers, maze solvers, and autonomous bots.
✅ Why it fits:
- Fast, accurate short-range detection.
- Small and lightweight.
2. Smart Parking Sensor
- Mount near the rear of a car or garage wall.
- Shows exact distance between the vehicle and wall.
✅ Benefits:
- Visual feedback in cm/mm helps with safe parking.
- Add a buzzer or LED for alerts at close distances.
3. Water Level Monitoring
- Mount sensor on top of a water tank or well.
- Measures distance to the water surface.
✅ Why useful:
- Calculate water height by subtracting distance from tank height.
- Add alert if water drops too low or fills up.
4. Height Measurement Tool
- Hold the sensor above a surface or a person’s head.
- Measure vertical distance from sensor to the floor or top of object.
✅ Example uses:
- DIY digital ruler or measuring stick.
- School science experiments.
5. Security or Presence Detection
- Place near a door or entryway.
- Detect people approaching (e.g., doorbell activator, light on, etc.)
✅ Enhancements:
- Trigger camera, log time, or activate a servo.
6. Industrial or Factory Use
- Measure part position or distance on conveyor belts.
- Detect material levels in bins or chutes.
✅ Why it’s practical:
- Non-contact measurement.
- Easy integration with microcontrollers and automation systems.
7. DIY Measuring Device
- Handheld or wall-mounted tool to measure distance to objects.
- Display in mm/cm/m makes it suitable for builders or hobbyists.
✅ Additions:
- Save measurements to SD card.
- Use buttons to scroll or reset.
Bonus 💡: Educational Use
- Demonstrates:
- Physics (speed of sound, time-distance relationships).
- Embedded systems (sensors, timing with
millis(), displays). - Clean coding practices (non-blocking loops, sensor integration).
🧠 How It Works
🌀 1. Distance Measurement Using HC-SR04
- The HC-SR04 has two pins:
- Trig (Trigger): Sends a short sound pulse.
- Echo: Receives the pulse after it bounces off an object.
✅ Process:
digitalWrite(trigPin, LOW);
delayMicroseconds(2);
digitalWrite(trigPin, HIGH);   // Start ultrasonic pulse
delayMicroseconds(10);
digitalWrite(trigPin, LOW);    // End pulse
- The
pulseIn(echoPin, HIGH)measures the duration (in microseconds) that the Echo pin stays HIGH, i.e., how long it took for the echo to return.
✅ Convert time to distance:
distance_cm = duration * 0.0343 / 2;
0.0343 cm/µsis the speed of sound in air.- Divide by 2 because the pulse goes to the object and back.
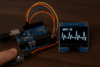
💡 2. Distance Display on OLED
After calculating the distance:
- In meters, centimeters, and millimeters,
- The result is printed to the 128×64 pixel SSD1306 OLED display using:
display.setCursor(x, y);
display.print("Meters: ");
display.print(distance_m, 3);
This updates every 500 milliseconds.
⏲️ 3. millis() for Non-blocking Timing
Instead of delay(500), we use:
unsigned long currentMillis = millis();

if (currentMillis - previousMillis >= interval) {
  previousMillis = currentMillis;
  // Do distance measurement + display update
}
millis()gives the number of milliseconds since the program started.- This lets the loop run constantly, and only triggers the measurement every 500ms, without blocking other tasks.
- Great for multitasking (e.g., button reading, networking, etc.).
✅ Summary
| Part | Role |
|---|---|
millis() | Controls when to take measurements (non-blocking) |
pulseIn() | Measures echo return time |
| Distance formulas | Convert echo time to distance |
| OLED display | Shows distance in m, cm, mm |
No delay() | Makes code responsive and multitask-friendly |
📌 Notes
- The
0.0343factor is the speed of sound in cm/µs. - Make sure your OLED is on address
0x3C. Use an I2C scanner if unsure. - Adjust
trigPinandechoPinif using other boards like ESP8266 or ESP32.
Here’s a complete Arduino sketch to measure distance using the HC-SR04 ultrasonic sensor and display the result in meters, centimeters, and millimeters on a 128×64 I2C OLED display (SSD1306).
✅ Required Libraries
- Adafruit SSD1306
- Adafruit GFX
- (Install via Arduino Library Manager)
🧰 Wiring
HC-SR04:
- VCC → 5V
- GND → GND
- Trig → D9
- Echo → D8
OLED (SSD1306 I2C):
- VCC → 3.3V or 5V
- GND → GND
- SCL → A5 (on UNO)
- SDA → A4 (on UNO)
(Adjust pins for ESP32 / ESP8266 or other boards accordingly.)
✅ Code (Arduino Sketch)
#include <Wire.h>
#include <Adafruit_GFX.h>
#include <Adafruit_SSD1306.h>

#define SCREEN_WIDTH 128
#define SCREEN_HEIGHT 64
#define OLED_RESET -1

Adafruit_SSD1306 display(SCREEN_WIDTH, SCREEN_HEIGHT, &Wire, OLED_RESET);

// HC-SR04 Pins
const int trigPin = 9;
const int echoPin = 8;

// Timing control
unsigned long previousMillis = 0;
const unsigned long interval = 500; // 500 ms between readings

void setup() {
  Serial.begin(9600);
  pinMode(trigPin, OUTPUT);
  pinMode(echoPin, INPUT);

  if (!display.begin(SSD1306_SWITCHCAPVCC, 0x3C)) {
    Serial.println("SSD1306 allocation failed");
    while (true);
  }

  display.clearDisplay();
  display.setTextSize(1);
  display.setTextColor(SSD1306_WHITE);
  display.setCursor(0, 0);
  display.println("Ultrasonic Distance");
  display.display();
  delay(2000); // Initial display only
}

void loop() {
  unsigned long currentMillis = millis();

  if (currentMillis - previousMillis >= interval) {
    previousMillis = currentMillis;

    long duration;
    float distance_cm, distance_m, distance_mm;

    // Send ultrasonic pulse
    digitalWrite(trigPin, LOW);
    delayMicroseconds(2);
    digitalWrite(trigPin, HIGH);
    delayMicroseconds(10);
    digitalWrite(trigPin, LOW);

    // Read echo time
    duration = pulseIn(echoPin, HIGH);

    // Distance calculations
    distance_cm = duration * 0.0343 / 2;
    distance_m = distance_cm / 100.0;
    distance_mm = distance_cm * 10.0;

    // Debug output
    Serial.print("Distance: ");
    Serial.print(distance_m, 3);
    Serial.print(" m, ");
    Serial.print(distance_cm, 2);
    Serial.print(" cm, ");
    Serial.print(distance_mm, 1);
    Serial.println(" mm");

    // OLED output
    display.clearDisplay();
    display.setCursor(0, 0);
    display.println("Ultrasonic Sensor");

    display.setCursor(0, 16);
    display.print("Meters: ");
    display.print(distance_m, 3);

    display.setCursor(0, 32);
    display.print("Centimeters: ");
    display.print(distance_cm, 2);

    display.setCursor(0, 48);
    display.print("Millimeters: ");
    display.print(distance_mm, 1);

    display.display();
  }
}
✅ Conclusion
This Arduino project using the HC-SR04 ultrasonic sensor and 128×64 I2C OLED display is a simple yet powerful way to measure distances with high precision in millimeters, centimeters, and meters. By using millis() instead of delay(), it stays responsive and ready for expansion—perfect for real-world applications like:
- Obstacle avoidance in robotics
- Smart parking sensors
- Water level monitoring
- DIY measuring tools
- Educational demonstrations
Whether you’re a beginner learning sensors or a maker building smarter devices, this project lays a solid foundation for adding intelligent distance-sensing capabilities to your Arduino-based systems.
📢 Enjoyed This Tutorial? Share It!
If you found this project helpful or inspiring, please consider sharing it with fellow makers and tech enthusiasts on social media! 🚀
Your support helps others discover useful tutorials like this, and motivates us to keep creating more.


